Showing posts with label You Sew Girl. Show all posts

Saturday, January 28, 2017

Bag Making Club 2017


If you love making bags then our latest mail order club is just for you.

This is a brand new online club where, over the year, you will receive 6 bag kits to create stunning bags to suit your own personal style. Once you join the club 1 Bag Making Kit (Pattern, interfacing and hardware) will be sent out to you every 2 months. Featuring bag patterns from You Sew Girl, Sew Sweetness, Two Pretty Poppets and Emmaline Bags plus high quality stabilisers and hardware, these kits will enable you to try out new techniques and expand your bag making skills. 

Each pattern has been chosen to introduce you to different techniques, stabiliser combinations and hardware. The patterns all have clear instructions and illustrations/photos.

 The first four kits are set but you have a choice of the following for the last two.


You can also choose if you prefer Silver or Antique Brass Hardware* and Black or White Zippers. 

Your Subscription Includes:
- 1 x Bag Pattern -
- All necessary interfacings and stabilisers -
- All required bag hardware (rings, closures, slides etc) -
- All zippers (choice of black /white) -
- BONUS useful sewing/bag making tool! -

Fabric is NOT included ~ great way to utilise your fabric stash.

Numbers are strictly limited so sign up now to avoid disappointment.

$68.00/kit (inc. GST and postage)

Payment will be charged every 2 months for a total of 6 payments ($408 total over 12months).
Kits will be posted in the first week of February, April, June, August, October and December 2017.
* The Butterfly Sling and Framed Purse Bag are only available in Silver.
Fabric is not included in the kits.


Hardware Colour
Zippers
Kit 5
Kit 6

Sunday, November 6, 2016

New in Store - 6th November 2016

This week I would like to introduce a new bag designer to my store, Lisa from Two Pretty Poppets. Lisa is an Australian designer and she has 11 patterns in print format. I have all of them available on the website and in store, I can't wait to get in and make some samples of these super cute looking patterns. 

We also had bagmaking supplies from Emmaline Bags and You Sew Girl arrive this week and next week I will have a large shipment of hardware from Hong Kong arriving as well. So 'almost' everything will be back in stock again.  I have already sold out of Style B frames from Emmaline but I will be getting more in again hopefully in two weeks. 

I have had some requests for gold coloured bag hardware, specifically the strap anchors but if there is anything that you really would like me to stock in gold please let me know and I will see what I can do.

Top Row

2nd Row

3rd Row

Bottom Row

'Til next week, happy Sewing :)
- Ky

Sunday, July 19, 2015

New in Store - 19th July 2015

This week a number of haberdashery items have been restocked or added to the store, including rotary cutters and blades, thread heaven and chalk pencils. We have also done a big restock of You Sew Girl patterns and associated bag making supplies.


Top Row

Middle Row

Bottom Row

Till next week, happy sewing :)
- Ky

Sunday, October 26, 2014

New in Store - 25 October 2014

This week we have received a few more designs from the Robert Kaufman Classic Horror Films collection including blood splatter on white and a horror movie poster panel. These are great designs for any last minute Halloween crafting or to be stored until next year ;)

We have a couple of new Riley Blake Knit fabrics including a cute little owl floral. This single knit jersey is a quality 95% cotton/5% spandex mix with great recovery and non pilling.

For anyone who was waiting for any Sewline or You Sew Girl Patterns or Bag Hardware we have just received a new shipment of these as well. Speaking of bag hardware we have been able to source coloured webbing, we have 38mm navy blue to start with, please let us know if you have any colours that you would like and we will do our best to get them in. 


Top Row
Middle Row
Bottom Row

Till next week
- Ky

Friday, July 11, 2014

Pattern Test Drive - The City Bag by You Sew Girl

Sadly it is time to retire our La Virgencita You Sew Girl City Bag sample, it has served us well but we have been sold out of this fabric for a while now and I wanted to try a new interfacing combination on a new one.


This new version is more vibrant and features Spot On Pindot Cardinal Red combined with a panel of Vintage Scrapbook Paris Fashion Black on the front and back. The city bag is fairly easy to sew with the trickiest part being inserting the zipper on the curved top of the bag. Even this isn't too difficult as Nicole's patterns alway have very good instructions and photos to guide you through all of the steps.


The finished bag is approximately 30cm (11-7/8") x 34cm (13-1/2") x 10cm (4") excluding the strap. The pattern includes instructions for adding both a zippered pocket (above) and compartment pocket (below) in the lining, you can never have too many pockets in a bag :)


Hardware
Hardware is optional for the strap on this bag but it always makes the finished bag look more professional. This bag features an adjustable strap by using a Slide AdjustersSwivel Snap Hook and a D-Ring.


Interfacing
On the La Virgencita City Bag I used Vilene S320 interfacing on its own with no wadding. While the S320 gave the bag a good structure it felt a bit too cardboardy for my liking. This time I have used S320 again but I have also added a layer of H630 wadding which softens the finish a bit as well as providing more structure. S320 is also fused to the strap which is 4 layers thick once it has been folded and topstitched. The result is a thin but sturdy strap that doesn't feel like it is going to break once you fill the bag with all of your stuff.


If you would like to recreate this bag here are the materials that have been used:

- Ky

Thursday, June 5, 2014

Pattern Test Drive - The Sling Bag by You Sew Girl

Today we are going to show off our new You Sew Girl Sling Bag. It is made out of a lovely Sweet Potato Orange Denim which matches fantastically with the feature panel of Kokka Sun Bear fabric. It is a fairly easy pattern suited to adventurous beginner to intermediate sewist. If you have made any You Sew Girl bags before then you will be able to whip this one up with no trouble at all.


The finished bag measures approx. 25cm x 25cm x 13cm (9-7/8" x 9-7/8" x 5-1/8") excluding the strap. The strap is grown on and can be lengthened and shortened as desired. This is the length straight off the pattern which is fine for a small petite person like our size 8 mannequin here but if you are taller/larger then you may need to lengthen it a bit.

There is an optional zippered pocket in the lining which is handy for holding all of those little bits and bobs that can get lost inside your handbag.

The feature fabric we chose is a bit lighter than the denim so we decided to appliqué it onto the denim rather than piecing the two together. A quick tip for folding over the raw edges of the overlay piece is to use 1/4" Quilter's Edge which is a double-sided iron on adhesive tape. 

  • Cut two strips for the feature panels, one for the front and one for the back.
  • Iron the Quilter's Edge onto the wrong side of each of the long edges, fold over and press again to get a very neat 1/4" seam. 
  • To attached the overlays onto the bag you can either use vliesofix (or similar) over the entire piece or just use more of the Quilter's Edge on the sides (which is what we have done). 
  • Top-stitch 2mm in from the edge of the overlay to hold it in place permanently.
Hardware
You can get away with having no hardware on this bag, though it is suggested to use a magnetic snap as a closure. As always you can add O-rings, oblong rings etc to jazz up and/or lengthen the strap.

Interfacing
The sling bag is a soft and slouchy bag so it can have minimal to no interfacing. The denim we have used is quite heavy so we have used a medium/light woven fusible interfacing on the facing pieces only (excluding the strap facing). There is a hard Peltex base to give the bag some shape.


If you would like to recreate this bag here are the materials that we have used.
- Ky and Cloud

Wednesday, May 28, 2014

English Paper Pieced 200mm Hexagon Purse

I have recently discovered English Paper Piecing and it is addictive!! I now have to find ways of incorporating it into projects so that I don't end up with heaps of little bits of paper pieced fabric everywhere :)

Today I'm going to show you how to use paper pieced hexagons to make up a 200mm rectangular framed purse. I have used the 200mm purse pattern from You Sew Girl so this post does not include a pattern or full instructions for sewing up the purse.


Requirements:


If you have never tried English Paper Piecing I recommend that you watch this brilliant video tutorial by Sue Daley to get you started.  


Step 1: Cut the hexagons as follows:
12 x Blue (Mini Calaveras Turquoise by Alexander Henry

I used the 1-1/4" acrylic template to make fussy cutting the sugar skulls easier.


Step 2: Sew together the hexagons as per the diagram below. You will have to make two of these in total.

Pink = Pink Animal Skin | Grey = Black Skulls | Blue = Blue Skulls

Step 3: Once you have joined all of the hexagons for each side you can remove the papers and give the fabric a press. 

Step 4: Fuse the interfacing and then the wadding to the back of each of the pieced fabrics.

Step 5: Once the interfacing and wadding has been fused, allow it to cool for a few minutes and then cut out the purse front and back.


Step 6: Cut out the purse lining from the lining fabric.

Step 7: Sew up the purse as per the purse pattern instructions.

Step 8: Flaunt your fancy new purse to all of your friends :)


- Ky

Wednesday, January 22, 2014

Travelling Bunny: 3-day Bag Masterclass with Nicole Mallalieu

Last week I flew down to Melbourne to attended a 3-day bag making masterclass with Nicole Mallalieu (You Sew Girl). The class was hosted by Kimono House which is a lovely little fabric shop in Melbourne's CBD which specialises in Japanese fabrics, kimonos/ yukatas and crafts.

Kimono House workshop space
Machines were supplied for all of the out of town students which was a great help.
I was lucky enough to score Nikki's Bernina for the 3 days :) 
On Friday afternoon Leanne, the owner of Kimono House, took us for walk around Melbourne CBD with a focus on craft. The walk ended at Spring Street Grocer, with what is reputed to be the best gelati in Melbourne. I tried three flavours (dairy free chocolate, salted caramel and pistachio) and approved of them all :)

A few of the locations we went to on the tour.
Top: Clementine's (all stock is made and crafted in Victoria) and Corky Saint Clair
Middle: Subject To Change, Gewurzhaus Herb and Spice MerchantsThe Cats Meow
Bottom: Morris and Sons, Spring Street Grocer
Nicole demonstrating the finer points of bag making.
Over the 3 days we learnt heaps of tips and tricks from Nikki including techniques for hard bag bases, zipper applications, customising handle straps, and interfacing options. Everyone had a great time and finished sewing up either a Day BagLarge Tote Bag or Beach Bag.

Hurrying to finish off our bags on Saturday afternoon

All of the finished bags
I made up a Cartas Marcadas Large Satchel and a very Nautical Beach Bag (Beach Bag still requires lining)
I'm quite taken with the bright striped interior of the Large Satchel, especially teamed with the hot pink zipper.
I had a great time away and picked up heaps of tips for professional bag making which I look forward to imparting to our customers and students. We are hoping to run a few bag making workshops at Voodoo Rabbit this year so make sure to sign up to our newsletter (top left on the side menu) for notification of upcoming classes.

- Ky

Wednesday, November 20, 2013

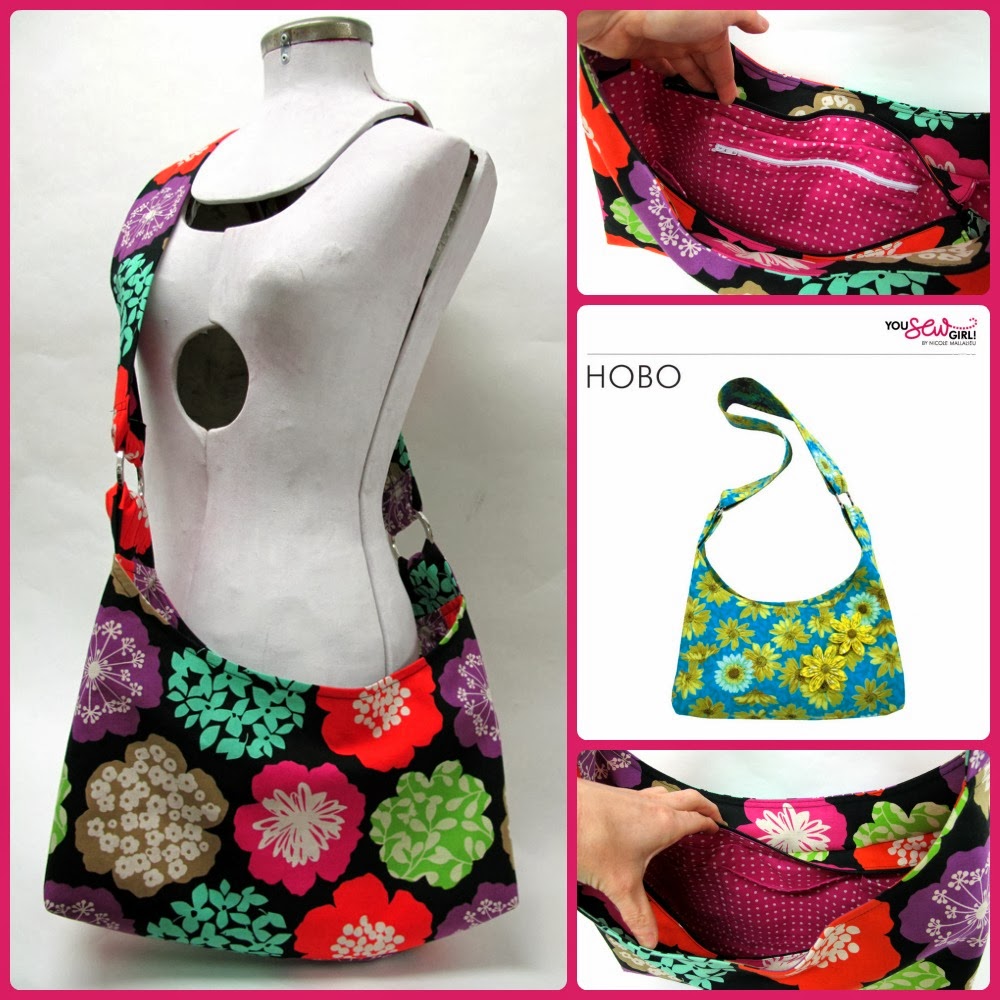
You Sew Girl Hobo Bag Sewing Pattern Test Drive

I actually made up this bag in early October but haven't had a chance to blog about it until now. If you came to the Brisbane October Craft and Quilt Fair you might have seen it as part of our display. I'd been wanting to make this one up for a while but as usual picking the perfect fabric was the sticking point :)

We finally decided on Echino Bloom Black for the outside of the bag, this fabric is 150m wide and non directional. To save fabric I cut out the pattern pieces perpendicular to the selvedge instead of parallel to it as per the pattern instructions. The lining is June Dot Pink, which is a fabric we purchased specifically to be used as a lining with Echino prints as the pinks used in both designs are so similar.

The final bag measures 20cm (8") tall x 30cm (11-3/4") wide x 10cm (4") deep, which I think is a good size, not too big but not so small that you can't fit anything in it. 

Difficulty
This pattern is rated for basic to intermediate sewing skills, I made the sample to shows off some of the more advanced optional features of the bag.
There is a zippered closure for the top of the bag but, if you are after a quick and easy closure option, you can use a magnetic catch or button instead. The instructions for all options are included in the pattern instructions. The zippered closure is inserted at the bottom of the facing which is 5cm below the top of the bag. If you think you will need that extra 5cm for putting stuff inside your bag then you should use the magnetic or button closure option :0)
Inside the bag lining I have added in the optional zippered pocket. I took this photo during construction as I think that it is the best zippered lining pocket I've every sewn. It is certainly the straightest :) 
On the other side of the lining I have inserted a divided pocket, which is the easier pocket option.

Interfacing
The Hobo is designed to be a soft and slouchy bag so I haven't gone overboard with creating structure with interfacing. The fabric is a 85% Cotton/15% Linen blend so it is a little heavier than quilting cotton. I have teamed this with medium weight fusible interfacing. The resulting bag doesn't stand up on its own but it contours more to the body while being worn. If you prefer a more structured bag you can do this by adding in a layer of light weight fusible wadding.

Overall this bag went together fairly quickly and easily. A good project to keep you occupied for a night or two.

If you would like to recreate this bag here is everything you will need:

- Ky

Wednesday, October 16, 2013

The Brisbane Craft and Quilt Fair Starts Today !!

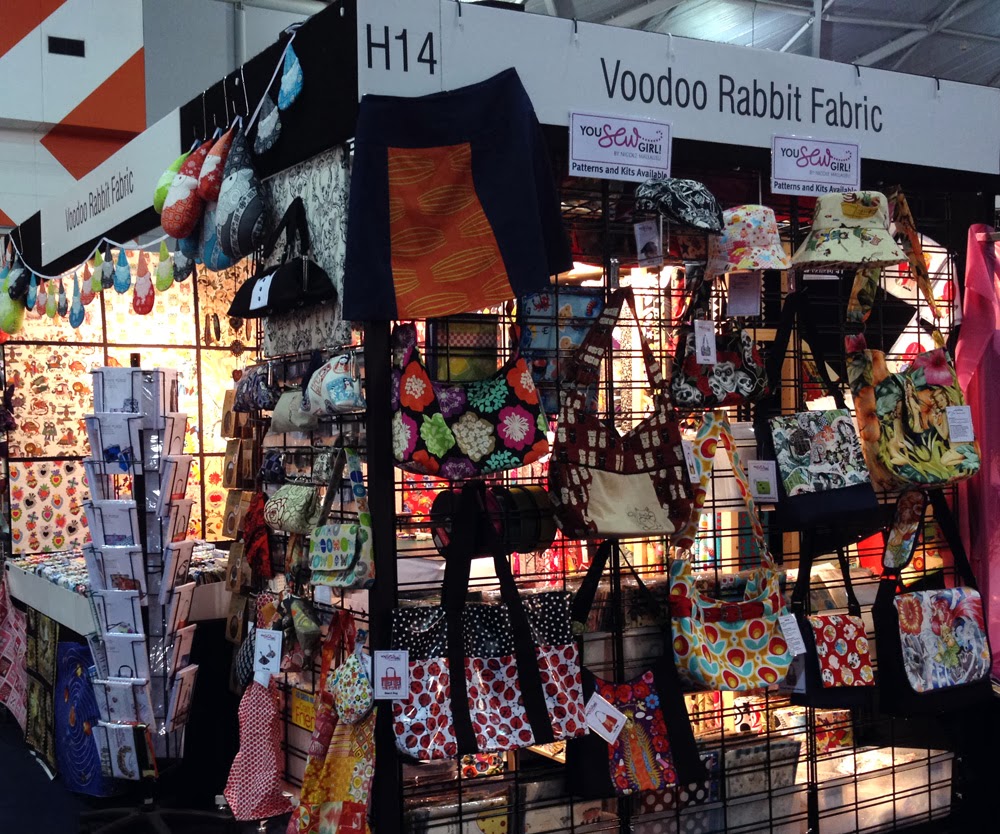
Whew, we have managed to get our stand setup and ready to go for the Brisbane Craft and Quilt Fair which starts today, October 16 and runs until Sunday October. It is amazing how much preparation goes into preparing for one of these shows which is why we are only doing the local ones in Brisbane for now. 

When: Wednesday 16th to Sunday 20th October
Time: 9am - 5pm daily
Where: Stand H14, Brisbane Exhibition Centre Halls 3 & 4, Cnr Glenelg & Merivale Streets, Southbank.

Please note that our East Brisbane showroom will be closed during this event and will reopen on Tuesday 22nd October.
Here are few quick snaps I took of the stand before we left last night.
Front View of our stand
You Sew Girl bag samples
Lots of yummy bolts of fabric
Directly across from us at H15 we have a demonstration space where you can watch StephC from Cake Patterns give short hourly talks about sewing with knit fabrics. Steph will also be available between demonstration times to answer any question you may have about dressmaking, knit sewing or Cake Patterns. You will also be able to purchase Cake Patterns and Riley Blake Cotton Jersey Knits from us during the Fair. 
Click image to enlarge
We hope to see you at the fair,

- Ky and Cloud

Wednesday, October 9, 2013

Zip-Away Shopping Bag Sewing Pattern Test Drive

The Zip-away Shopping Bag is both trendy and environmentally friendly. Small enough for your handbag or car's glove compartment and a great gift idea. The cleverest part of this pattern design is the wallet outer becomes the hard base for the bag when it is opened up. It is also easier than you would think to put together thanks to some handy use of fusible web and interfacing.

Be warned - once you start making these you won't stop - I've made four so far!

The shopping bag is quite large - it unfolds to 29 x 36 x 12 cm . It folds away into a tidy little 15 x 12 x 2.5 cm pouch. The first sample I made (the Dotted Line sample below) has long handles so it is a bigger bundle to zip up. The Sushi sample has short handles and I think I prefer this length.

The best part is working out the fabric combos for the outer pouch & inner shopping bag. You can also save a bit of money if you choose a non-directional print for the main shopping bag - you will only need 75cm of fabric instead of the recommended 95cm.

Difficulty
This pattern is rated for an intermediate sewist but a beginner that is more than confident with zippers should be able to tackle it. The stiff interfacing and the curved zipper make this pattern look a lot harder than it really is. The majority of the wallet section is assembled using Vliesofix to fuse everything, including the zipper, in place before you even sit down to your sewing machine. The entire bag can be made in one afternoon or evening.
Interfacing
I used Peltex 72F for the wallet/base of the bag but you can also use Fast2Fuse. Apparently Peltex is slightly more difficult to manipulate than the Fast2Fuse. I have only ever used Peltex so can't offer a comparison at this time. I didn't have any trouble using it for this particular pattern. Peltex is a very thick and stiff interfacing (approx 2mm thick) and is fusible on both sides. Nicole uses it in a number of her patterns, mainly for bag bases.
The zipper is sewn into place once the wallet and the bag is fused together. Just be careful not to fuse the zipper teeth too close to the wallet edge. The closer to the edge the teeth are, the harder it will be to zip up. Having said that, it is probably one of the easiest zippers you will ever insert around a curve.

The remainder of the shopping bag is sewn up remarkably quickly. This makes it great project for Christmas or Birthday gifts - quick, easyish, practicals and cute to boot! You can customise the fabric
combos to suit both men and women, kids and adults. Perfect!

If you would like to recreate this bag here is everything you will need:
Sushi Bag Fabric Combo:
Dotted Line Bag Fabric Combo:
We will have plenty of the Zip-Away Shopping Bag patterns as well as interfacing kits available at the Brisbane Craft and Quilt Fair next week.
- Ky

Wednesday, October 2, 2013

Notting Hill Mod Bag

Just over a month ago we asked for help with our Mod Bag Dilemma. The favourite fabric combo by far was the Notting Hill Primrose option, which was fortunate as it was our favourite too. They were made for each other - the design is more than a bit 60's and well... Mod :)
Difficulty
The Mod Bag is an advanced pattern, this is mainly because it has a gusset. Inserting the gusset is the trickiest part of this design, especially the topstitching of said gusset. The first side is not so bad but attaching and topstitching the second side requires all sorts of interesting manoeuvring to get it through the sewing machine. 
I sewed this bag on a basic Brother PS-55 mechanical sewing machine using only the standard foot. Having a needle down option on your sewing machine would be a great help with the topstitching of the gusset to avoid having stitches going astray as you try to wrangle the fabric through the machine.

Options
The Mod is the little sister to the Carry All bag and like the Carry All comes with a lot of optional bells and whistles. I decided to keep it fairly simple and just go with the belt, magnetic closure, o-rings, internal zippered pocket and internal divided pocket. The contrasting belt really makes this bag stand out from the crowd. I would have preferred a slightly larger and simpler belt buckle but they can be quite difficult to find.
Interfacing
As per the Small Tote bag I have used medium-heavy fusible woven interfacing paired with H630 wadding to give the bag structure without being too stiff. The medium-heavy interfacing is one of the trickier interfacings to fuse so I recommend you read through Nicole's Tips for Using Interfacing and Troubleshooting Interfacing before you start. Nicole is a fount of knowledge on interfacing and I picked up a lot of tips from these two article which have vastly improved my bag making skills simply by changing the way I fuse my interfacing and wadding.
The fabric choice combined with the interfacing and wadding make this one of my favourite bags that I have sewn. It is a good sized bag for everyday use. Not overly big but still large enough to carry everyday essentials while you are out and about.

Size comparison of the Carry All on the left and the Mod bag on the right.

More variations of the Mod bag as shown on Nicole's website.


If you would like to recreate this bag here is everything you will need:
- Ky

Wednesday, September 25, 2013

Totes Cute Tote Bag

When we order in fabric we ask, "What would you make from it?" before we buy it. If the fabric doesn't talk to us, we don't get it in. We had always planned to make a kid's version of the You Sew Girl Small Tote and Satchel but we were waiting for the perfect fabric. This ultra kawaii animal print fabric from Cosmo just screamed "Totes Cute Tote" when we saw the sample :) The fabric is a heavy canvas base cloth so it is very durable and the rich red background colour looks great teamed up with our Indigo Denim.
Difficulty
The Small Tote and Satchel pattern is a great project for a beginner as it contains lots of tips on the basics of bag making and sewing. For more advanced sewists it is a quick and easy project that can be whipped up in an afternoon / evening session (I think this one took me 3-4 hours in total).

Interfacing
After my Alexander Henry Mirage Carry All Bag blog post, Nicole from You Sew Girl suggested that I try using Medium-Heavy interfacing paired with H630 wadding. This would give me the structure I was after but not be as bulky as the Medium Interfacing paired with H640 wadding combo. I am happy to say that this is now my favourite way to interface my bags :)


Options
Most You Sew Girl patterns come with a number of different finishing options. I have made the longer version of the bag, with a flap and internal zippered pocket. I think it is always nice to have a least one pocket on the inside for storing little bits and pieces. I particularly like the red zipper against the blue fabric. If you can't match a zipper to the main colour of a fabric don't be afraid to try matching it to one of the other colours in the print.
I have used plastic looplocs and tri-glide with 38mm webbing to make an urban style adjustable shoulder strap. You can find the tutorial on how to make an adjustable bag strap here.
Like all of Nicole's pattern the Small Tote and Satchel is very versatile and allows you to make many variations using just the one pattern. These are just a few of the variations that Nicole has made, you can find more images as well as descriptions on her website.

- Ky