Monday, December 21, 2009

Gift Guide Goodness... Again!

Etsy really seems to like our Pixelated Patchwork Cushions - this time they've featured our Skull Cushion in the Tech Lovers Holiday Gift Guide. This is same Gift Guide that our Gingham Invaded Cushion was featured in at the beginning of the month.


There are some fantastic items in this Guide and it is a privilege to be included (again).

Monday, December 7, 2009

Gingham Invaded & The Tech Lover's Gift Guide on Etsy

Last Friday we were lucky enough to have our Gingham Invaded Space Invader Cushion Covers included in Etsy's Tech Lover's Holiday Gift Guide!


The spot was short lived (less than 24 hours) because we had somebody buy all three of the listed cushions in one transaction. We relisted, I tweeted the listing and then Etsy tweeted a link to our relisted cushions!

To top it off... Etsy then put them up on their Facebook Fan Page!


We've had over 1,000 views and 21 hearts on the relisting since Etsy tweeted and put it Facebook.

All I can say (other than "Thanks, Etsy!") is WOW!

Don't forget that you can win one of our Black & White Space Invader Cushion Covers over at the Little Waltz blog - entries close 14th December!

Friday, December 4, 2009

Sleeveless Shirt with Side Lacings

I have finally managed to find time to sew something new for myself. I've actually had this shirt cut out for a month or more and thought it was time to get around to sewing it.


Red Striped Shirt - Front

I got the idea for lacing up the sides of the shirt from a book I was flicking through at a book shop, I can't for the life of me remember the name of the book. It was something along the lines of anticraft or alternative sewing and is showed how to alter an op-shop shirt to have lace up sides. I decided I would make the shirt since I can never find anything that I am specifically looking for in op-shops.

The main fabric is a poly/cotton blend in a very nice red that is really difficult to photograph, it always looks really washed out. It also has a fine black pinstripe running through it. Ever since I first saw this fabric I wanted to make a shirt out of it. The binding and collar are all out of a fabric that I found in my stash that was of a similar weight and feel to the red fabric, I have no idea what it is nor where I got it from.

I used New look pattern 6704 view D (without the pockets) as the basis for the shirt.


I made a size 10 but since finishing the shirt and wearing it for a day I think it is a little too big around the top and perhaps an inch or two too long, I really should have done a quick tissue fit first.

Red Striped Shirt - Side Detail 02 Red Striped Shirt - Side
There are 44 eyelets in total, each one was set using a hammer, it took two hours. Very tedious. I think that I really should buy a better eyelet setting tool. I currently use a hemline one but it is made of plastic and when you are doing such a large quantity of eyelets the tool gets destroyed pretty quickly and you end up with wonky eyelets.

I couldn't find any ribbon in my sewing box and I didn't want to go out and buy something so I decided to make the lacing from 12mm poly cotton bias tape that I folded in half and sewed together. I think it worked quite well. The buttons were originally intended for my jacket but since I changed the buttons for the jacket I have quite a few of these buttons available.

Tuesday, December 1, 2009

Our first giveaway!


The lovely Celeste at Little Waltz has featured Ky & I as part of her "Waltzing through with Talent" series. To celebrate, we've offered up one of our Pixelated Patchwork Cushion Covers for a giveaway!


To read the interview and to enter the competition, click here.

Monday, November 23, 2009

Sneaky Peeky

Ky has ordered quality control samples of the new colours for her spiderweb fabric on Spoonflower - it should be available for sale early December! In the meantime, here's a sneaky peeky look at some of the other new fabrics coming into stock before Christmas for listing in our Etsy store.


There's new buttons on order too - including steampunk inspired compasses, more of our popular brass riveted buttons, mini-skulls and  anchors.

Wednesday, November 18, 2009

Kustom Krafts - 08.11.09

I know it's a little late, but here are some pictures from our first market, Kustom Krafts.


So much stuff for one little market stall! Good thing my car has a big boot - there's three tables in there plus all our stock.

We set up in an L shape - below is the back table which had all our fabric bolts and our cushion covers. The sign on the wall looks a little bit too temporary for me - I'd really like a professional banner done but I think that will require some saving up. It's more important to spend our money on new stock!


On the left side, in the corner we had a small table with our cutting mat. The last side of the L shape was a table with our precut fat quarters, vintage fabrics and our button board. I did take photos of the whole stall but they came out blurry - maybe I was shaking with excitement / anticipation?

We made a board to display our buttons and badges on by covering MDF with foam and then stapling some velvet panne (leftovers from Ky's sewing) over the top. We put a little hinged stand on the back so it wouldn't fall over.


The button board was in front of the open window - it would have been better on the other table because it was hard to see the buttons (especially in the afternoon) because they were in shadow. It's little things that can make a big difference I think.

Ky & I spent a fair amount of time sewing our little buttons onto their cards but I think they look really cute packaged up that way - a lot nicer than just grabbing them out of the tube and putting them into a plastic bag!

We also designed and made aprons for the stall - we worked out how big change bags were for the pocket divisions, had a pocket for our rotary cutter & i-phones, and a super secret pocket behind the front one for putting our notes into. Here's Ky in hers...


The fabric for the front pocket is 'Fifties Kitchen' and it was one of our most popular fabrics that day. We used our red cotton heading tape for the strings.

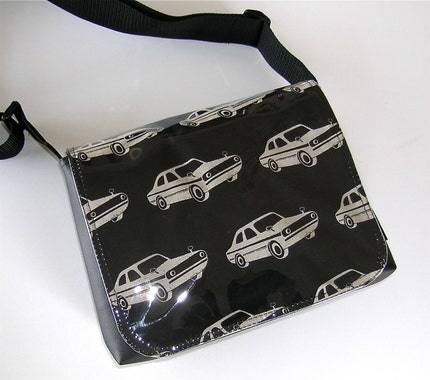
And of course, we can't forget the cars! I love the red & white one best...


We didn't make a lot of money or sales on the day - the market venue was changed from the last time so maybe people couldn't find it? We did get a great practice run for our stall setup, we met some really lovely people and we were given lots of feedback about what we should stock more of.

The next Kustom Krafts market is tentatively scheduled to happen in January, 2010 and we'll be there again.

Let us know if you have any suggestions about how we can improve our stall by leaving a comment :D

Tuesday, November 10, 2009

Brand New! Voodoo Rabbit Fabric: Spidery Web Black

We have a new fabric available for sale on our Spoonflower shop - a simple black spiderweb pattern over a plain background (the colour of the base cloth). We showed the sample of this at Kustom Krafts last weekend and it received a good response so we decided to make it available for purchase.


Spidery Web - Black

It is based on my orange and purple spiderweb Halloween design (also available on Spoonflower).


Spidery Web - Halloween


The initial orange and purple design came into being as an entry for Spoonflower's Halloween themed Fabric of the Week competition. I've always liked spider web patterning and one of my favourite fabrics is a black spiderweb lace. I bought it from Spotlight once but have never been able to find it again. As soon as we track some down we'll be stocking it though.

I plan to make a few more colour variations of the spider web design soon - we've had a request for the black web on a fluro zombie green background. Leave a comment with any other colour combinations you think would look good or just let us know what you think of the design.

Monday, November 9, 2009

Sucker Love - A Tentacular Treasury

I made my very first Etsy Treasury today! There are heaps of Etsy Dark Team members in this one. The next one will be a DUSTer bonanza (I'm already planning it).


 The treasury will only last until Wednesday so click here to give it some love while it's still around.

Friday, November 6, 2009

Kustom Kraft Market


Lots of rockabilly, retro, gearhead goodness on show & for sale. Hot babes with sexy tatts, high maintenance hair & fabulous clothes. Oh, and Voodoo Rabbit will be there too :P

PS: If you come you can also see for yourselves that Ky isn't just a figment of Cloud's imagination...

Thursday, November 5, 2009

Writers block

God - twitter has ruined me! I knew this would happen. I can't write anymore because everything is now compressed in my mind to 140 characters or less.

Pictures speak a thousand words right? Then here's a 5,000 word essay...


Wednesday, November 4, 2009

Gosu Rori Jacket - Finished

I finally managed to finish my gosu rori jacket. This is possibly one of the most complex sewing projects that I have undertaken and I must say that I am quite pleased with the results. I think that the finished item looks awesome and the fit is pretty good as well. I actually finished the jacket and then decided that it was too big around the bust so I took it in another 2cm on each side. Luckily the lining is not attached at the bottom and I had fairly easy access to the side and sleeve seams.

Gosu Rori Jacket - Finished Front Gosu Rori Jacket - Finished Back

On the front there are 7 x 15mm Skull and Bone buttons with another 3 on each sleeve.


Gosu Rori Jacket - Finished Back Detail

The back is by far more interesting than the front of the jacket. It has been laced with velvet ribbon and I have used 2 x Skull and Bones 22mm metal buttons on the back waistband.

What I have learnt is:

if you think it is too big when you are constructing the garment there is a good chance that you are right and perhaps this is a better time to re size it than when you have finished.
  • make sure that the sleeves are the right way around before you sew them in, unpicking black cotton from black fabric is quite difficult.
  • always use pinking shears on lining fabric to stop the fraying.
  • read the instructions as you go so that you don't have to unpick the back seam, waistband seams and top stitching to add the loops for the lacing.

It's almost summer here in Brisbane (31 degrees Celsius today) so I won't get to wear this jacket until February next year when I head to Japan with Cloud. It will be the end of winter in Japan then so this jacket will be perfect!

Quilt Block

A friend of mine from work is going to a wedding and one of the other guests decided that a wedding quilt would be a lovely present to make for the happy couple. So she sent out a letter to each of the other guest requesting that they make up a quilt block for her to sew into the quilt. My friend and his wife have no idea about how to make a quilt block (I'm sure a lot of the other guests will also be at a loss) so they asked if I could make one up for them. This was quite a challenge as I do not know the couple getting married and all I had to go on was the theme of sculptures by the sea and a swatch of some truely horrendous colours (I forgot to photograph this).
First up I am not a seaside person and I don't as a rule use yellows, blues and greens, so even coming up with a design and then choosing fabric was difficult. In the end I used this sculpture as inspiration...
Jorn Ronnau. return ticket to sydney. Sculpture by the Sea, bondi 2008. Photo Matthew O'Sullivan
and came up with the following.

Wedding Quilt Block

It is a 9 inch square with a 1/2 inch seam allowance added. I sewed the main sections together on the machine and then added the bias strips on top. The sashiko lines and appliqued hearts are all hand sewn. The colours are slightly more subdued versions of the ones on the swatch. Hopefully it will work with the rest of the quilt. If I get a photo of the finished quilt I will post it up after the wedding early next year.

Saturday, October 24, 2009

Hungry Hungry Hippo

As promised here is my second softie for Mirabel, more or less finished. Her name is Henrietta Hippo and I found the pattern for her in Sew Hip issue 3.

Henrietta Hippo 02

She is actually quite large at 40cm long and 18cm tall.

Henrietta Hippo 01

I may still add on some eyelashes so the eyes don't look so weird.

The pattern wasn't too hard to follow though I did have some difficulty around the head where the pieces didn't all meet up quite right but the bow hides most of that. All in all softies aren't my favourite thing to sew and I hate stuffing them even more, so back to garments sewing for me.

Monday, October 19, 2009

Spoonflower Marketplace is Open

You can now buy all of Ky's fabric designs directly from Spoonflower!
Buying direct means you save money and you can order from an 8 x 8 inch sample up to a full 25 yard bolt. You can also choose what fabric type you want to put our prints on (bamboo, upholstery weight, quilting cotton, etc).


These designs are available for purchase now and they take approximately 2 weeks to ship to Australia. To find Ky's fabrics search for 'voodoorabbit". Let us know what you think!

Thursday, October 15, 2009

Wednesday, October 14, 2009

Funky Friends

Last Sunday I decided that the activity for the day would be softies, which is the next challenge theme at Bulimba Belles. So while Cloud tried to design a voodoo rabbit softie with interesting mixed results, I decided to just make up a pattern I've had sitting in my cupboard since the last Stitches and Craft Show.

Gertie Geckos

Meet Gertie gecko, from Funky Friends Factory and her twin sister Gertrude. Gertie (left) will be joining the Softies for Mirabel appeal and Gertrude (right) will be going to Polymonkey who proves that you are never too old for soft toys.
The pattern was easy to follow and mostly easy to assemble though I will admit to some frustration when it came to attaching the legs. They are attached once they have been stuffed and there isn't a lot of space in that narrow body to fit one stuffed leg while you are trying to fit it all under the sewing machine presser foot let alone all 4. Luckily the polar fleece stretches to give you a bit more room. The finished product is super cute though and I love the googly eyes and big feet.
The original pattern is for a wheat heat pack but for the Mirabel appeal I have filled Gertie with hobbyfill to make her child friendly. Gertrude, who doesn't need to be child friendly, has plastic pellets in her feet to give her some weight and hobbyfill in her body. I was going to make her a heat pack but Polymonkey didn't like the idea of microwaving a Gecko, even a toy one.
I have one more Softie for Mirabel half made, this one is made from cotton fabric and turning out to be a bit larger than expected. I will post about it soon.

Tuesday, October 13, 2009

We've been featured in a Treasury!

Some more Etsy Treasury love for Voodoo Rabbit.


Thank you Vicki at Redeem Designs (a fellow DUST member) for featuring our buttons!

Etsy's Dark Side Street Team: October 16th - 18th Etsy Dark Team Weekend Deals!

We're having a Halloween sale with the Etsy Dark Side Team and will be offering 5% off everything in our shop. Click the link below to check out some of the great shops offering discounts this coming weekend.

Etsy's Dark Side Street Team: October 16th - 18th Etsy Dark Team Weekend Deals!

Adventures in Toy Land

Further adventures in toy making by Cloud today.

Ky & I want to make a 3D soft toy version of our Voodoo Rabbit logo. Usually I make the weird toys so I was 'volunteered' to come up with a prototype / pattern. Let me just start with the disclaimer that I'm not good at visualising a finished product from a pattern, let alone knowing about construction of shapes from fabric. I've only been sewing for about 18 months & I do it sporadically at best. I usually do patchwork and there's no shape construction there -  the designs are flat.

OK, here goes....

I started off by cannibalising a pattern from a bunny rug for the head, scanned it in & reduced the size. Then I needed to come up with the shape for the body & legs. I drew it all out on scrap fabric and got ready to sew together the first attempt.


The pattern works (in theory) by creating the bunny in quarters and then joining all the bits together.


I figured unpicking would be necessary at some stage of the process so put in bright red thread & set the stitch length really long so it wouldn't be to feral to do when the time came. Good thing I did because...


...I sewed the bum of my rabbit to the rest of its body when I joined it all up! After fixing that little hiccup (much giggling from Ky & me before I could do that though) I started to turn him out to see what he looked like.

Here's the head - so far so good....


And now the rest of him....


Yup - that's right - I only gave him one leg. Told you I was bad with picturing how something will look just from a pattern. Ky & I nearly wet ourselves we were laughing so hard.

Ky has named him Stumpy but I think I'll call him Pogo (just picture how he'd jump & you'll understand why). Any other suggestions for names?

I'm still working on him - there will be more posts about this project but hopefully not so disastrous!